
As a professional editor for 10 Studio, an animated explainer video production company, I know firsthand how crucial storyboards are in the animation process.
A storyboard visually maps out each scene and shot sequence for an animated film or short. Much like a comic book, it shows what will happen on screen through a series of illustrations and instructions.
When I first started out, I didn’t fully appreciate the importance of storyboarding. I figured you could just jump into animating. Boy, was I wrong! Without a comprehensive storyboard, your animation will lack cohesion and planning. A well-crafted storyboard is the foundation for animation success.
In this in-depth guide, I’ll share everything you need to know to create a killer storyboard for your next 2D animation project. You’ll learn storyboarding basics, visual examples, and tips from my own experience. Let’s dive in!
Why Invest in Storyboarding?
Animation projects flounder without a solid storyboard. Here are the key reasons to dedicate time upfront:
Visualize the Story Arc
Your animation can’t fully come to life until you map out each narrative beat visually. A storyboard displays the entire storyline start to finish across panels and pages. This clarifies the arc and progression in a tangible way.
Organize Shots
A storyboard carefully sequences each shot and scene. This organization provides crucial logic and structure for production. Jumping straight into animating without this meticulous breakdown will lead to a disjointed end product.
Map Scene Transitions
The storyboard graphs out how scenes flow together through cuts, fades, wipes, match cuts, and other transition techniques. This stealthily guides viewers from one moment to the next.
Establish Timing and Pacing
Storyboards indicate the duration of each shot, which informs the pacing and rhythm. You can play with timing to build suspense or control the flow. This level of granular timing gets established in the storyboard phase.
Align Team and Stakeholders
When shared across your team and stakeholders, the storyboard ensures everyone understands and supports the vision before costly animation work begins. This alignment is priceless.
Plan Production
Detailed storyboards allow you to plan production schedules and budgeting based on the exact scenes and shots required. It also helps assign shot sequences across animators.
Iterate Efficiently
Storyboards can be revised and refined much faster than finished animation. Get feedback, spot issues, and improve pacing earlier in the process when it’s easier to make changes.
In summary, storyboarding is an indispensable step that prevents wasted effort, confusion, and misalignment during production. The upfront time investment pays back exponentially in efficiency and cohesion.
Storyboard Elements
Before we get into the creation process, let’s break down what comprises a storyboard visually:
Panels
Pages are divided into panels showing key scenes and shots. Panels are drawn sequentially to indicate progression. Often 3-6 panels appear on each page.
Action
The panel sketches depict important character and object movement using stick figures, shapes, and perspective. Action is the backbone.
Dialogue/Captions
Dialogue, narration, sound effects (SFX), music cues, and other context live below panels in captions. This augments the visuals.
Transitions
Transition notes like “fade to black” or “wipe right” show how shots flow together between panels and pages.
Camera Shots
The camera perspective and distance for each shot is specified through terms like wide, close-up, overhead, zoom, etc.
Timing
Shot duration in seconds/frames or descriptive cues like “hold 5 secs” indicate timing and pacing.
Layout
Panels, captions, and other elements are thoughtfully arranged on the page for clarity and flow.
Now that we’ve broken down the elements, let’s explore the process of crafting a captivating storyboard.
How to Create a Storyboard: Step-by-Step
Follow these steps to develop an effective storyboard for your animation project:
1. Write a Detailed Story Outline
Always start by writing out your full narrative in an outline format. Break it down scene by scene and beat by beat highlighting key dialogue, actions, transitions, etc. Nail down the story first before visualizing.
2. Break Down Shots
Next, break your story down shot by shot within each scene. This is called a shot list or shot plan. Determine things like camera angles, movement, distance, perspective, and duration for each shot.
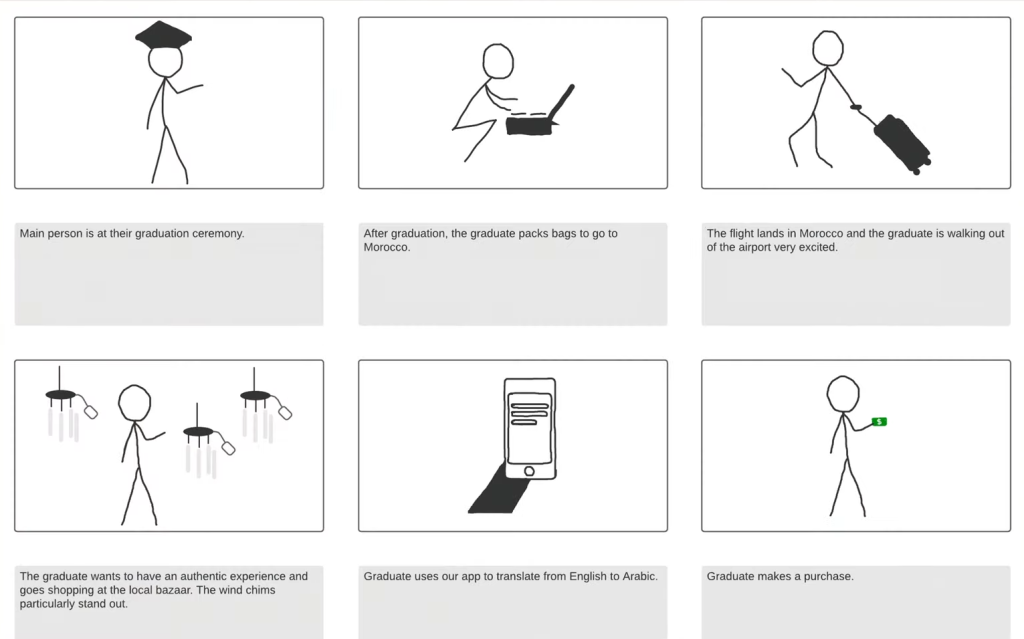
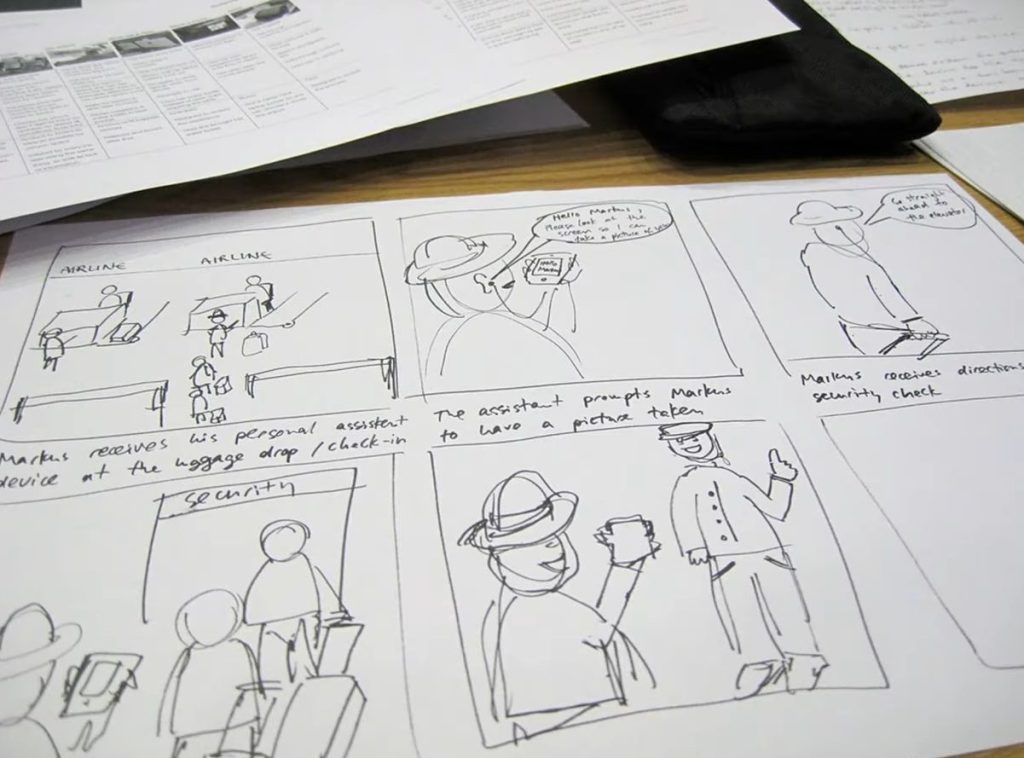
3. Create Rough Sketches
Draw rough stick figure sketches showing key action and movement for each shot in your shot list. Stick figures work perfectly at this stage. Focus on action, framing, and camera perspective.
4. Add Captions
Include dialogue, narration, sound effects, music cues, and any other context needed under each panel. Captions should enhance the visual storytelling.
5. Refine Shot Transitions
Look at your sketches and refine how you want shots to transition between panels and pages using cuts, fades, wipes, etc. Smooth transitions create seamless flow.
6. Adjust Timing
Review your boards and adjust timing for each shot to control pacing. Shorter shots quicken pace while longer shots build suspense. Find the right balance.
7. Refine Layout
Tweak the arrangement and layout of panels, captions, and elements on each page for the best visual story flow. Careful layout improves clarity.
8. Gather Feedback
Share your draft storyboards with team members and key stakeholders for feedback. Incorporate notes to improve storytelling, flow, clarity, and engagement.
9. Finalize and Share
Make final tweaks, then finalize your storyboards and share them out for production. This vital step is now complete!
10. Add Rich Details
Include lighting, shadows, focus, music, sound, depth of field, camera shakes, aspect ratio, and other details that fully bring the storyboard to life.
Let’s look at some visual examples and breakdowns for key steps:
Here is a sample shot list:
This shot list breaks down shots within a scene specifying camera perspective and movement.
Below are rough stick figure sketches for the shot list:
Focus on stick figures to map out animation action and flow across shots.
Here you can see captions added:

Brief captions augment the visual storytelling and pacing.
Using this comprehensive creative process will produce a well-crafted, visually engaging storyboard.
Now let’s explore some pro tips and techniques for taking your storyboards to the next level.
Advanced Storyboarding Techniques
Integrate these techniques into your storyboards like a pro:
Dynamic Camera Angles
Use interesting and dramatic camera moves like swooping cranes, tracking dolly shots, handheld camera, Dutch angles, and more to add visual variety.
Clever Transitions
Go beyond basic cuts, fades, and wipes. Try jump cuts, match cuts, montages, whip pans, flashbacks, and other transitions to spice things up.
Thoughtful Composition
Follow photography and cinematography principles to frame balanced, striking compositions within each shot and scene.
Purposeful Lighting
Note how you intend to light each scene, whether moody low-key lighting or bright high-key lighting. Lighting profoundly impacts mood and tone.
Noting 3D Spaces
If working with 3D animation, carefully design and note the 3D space for each scene including depth, shadows, lighting, textures, etc.
Camera Movements
Map out precise camera movements like zooms, pans, tracking shots, and camera shake to make scenes more dynamic.
Change Duration
Vary shot duration between quick cuts and extended shots to influence pacing and storytelling. Long slow shots build tension.
Aspect Ratios
Consider cinematic aspect ratios like 16:9 or 2.35:1 based on the feel you want. This impacts composition and perspective.
Character Poses
Draw important character poses and facial expressions for impactful moments to inform animation.
Advanced techniques like these elevate your storyboards from bland to beautiful! Let’s now dive into collaborating with your team on the storyboard which is critical.
Collaborating on Storyboards
Storyboarding should be a collaborative process, not a siloed one! This enables you to:
- Gain diverse creative perspectives
- Identify potential problems or gaps
- Ensure alignment across the team
- Build collective buy-in on the vision
Here are some tips for driving collaboration:
Early Involvement
Involve animators, producers, and leadership early in storyboarding so they feel invested in the vision.
Share Often
Circulate storyboard drafts frequently for feedback from all stakeholders. Use collaboration software for easy version control.
Storyboard Reviews
Conduct structured storyboard review meetings where everyone provides thoughts and suggestions. Document all feedback.
Openness to Ideas
Stay open to ideas from your team during storyboarding. Welcome critiques and alternative approaches.
Unite the Team
Use the storyboard as a rallying point to unite your team around a shared creative vision.
By taking a collaborative approach, you’ll gain amazing insights to improve your animation storytelling and also avoid costly revisions down the line.
Now let’s look at leveraging your polished storyboard during production to maximize quality and efficiency.
Leveraging Storyboards for Production
You’ve put in the hard work to craft an awesome storyboard. But the job isn’t done! Here are tips for leveraging your storyboard through the production process:
Print Extras
Print out multiple copies of the final storyboard so the whole team has easy access to reference.
Digital Version
Have a digital version (e.g. PDF) that’s easy to share, track versions, and leave comments on.
Shot Assignment
Use the storyboard to logically divide and assign sequences of shots across your animation team.
Regular Reviews
Conduct regular storyboard reviews even during production to check progress against the original vision.
Markups
Have team members mark up their copy with notes, questions, and feedback as production unfolds.
Guide Animatics
If creating an animatic (like a moving storyboard), adhere closely to storyboard layouts, transitions, timing, etc.
Match Final Animation
Review final animation against the storyboard to ensure every scene aligns and matches the original vision.
Allow Some Flexibility
Stay open to reasonable modifications based on discoveries during animation. But avoid major deviations.
If any scenes involve important animated infographics, diagrams, or data illustrations, thoroughly plan and refine these visual assets at the storyboarding stage to ensure seamless execution later.
Troubleshooting Storyboards
Even seasoned animation pros run into issues during the storyboarding phase. Here are some common problems and how to address them:
Story Holes
If you get feedback that your story is confusing or contains gaps, go back to your outline to smooth out the narrative flow before revisiting your boards.
Action Confusion
If actions in certain shots are unclear, add more sketches and captions to better demonstrate what’s happening to avoid animator confusion.
Pacing Issues
If certain sections drag or feel rushed, review your timing and adjust duration of sluggish or fast shots. Pacing must feel right.
Scope Creep
If your boards introduce unnecessary new locations, characters, or other scope, rein it back in to focus on what’s essential for the story.
Lack of Unity
If feedback indicates lack of cohesion in style or tone, limit variables in your shots, angles, lighting, and compositions to achieve unity.
Collaboration Gaps
If you receive disjointed feedback, increase collaboration. Unify your team around the vision in storyboarding to prevent downstream issues.
With some practice and tweaking, you can master the art of clean and compelling storyboarding for animation!
Bringing Your Storyboard to Life
With your storyboard complete, it’s time to breathe life into your animation!
Here are a few tips for leveraging your storyboard effectively during production:
- Make copies for your animation team to reference. Digital versions can easily be shared.
- Have team members mark up their copy with questions and feedback.
- Refer back to it often to maintain alignment on creative vision.
- Be open to revisions based on discoveries during the animation process.
- Ensure the final animation matches the original storyboard as close as possible.
Now get ready to bring your story to life, scene by scene! The time invested upfront in storyboarding pays off hugely in downstream efficiency and quality.
Animation Storyboard Examples
One of the best ways to learn about storyboarding is by looking at examples, especially ones that compare the storyboard to the finished animation.
Here are some excellent side-by-side storyboard animation examples:
“Into the Unknown” from Frozen 2
Here the storyboard for the famous “Into the Unknown” musical number is compared to the final animation. Pay attention to the use of shading in the storyboard to convey lighting and mood.
Taskmaster App Promo
For this animated promo, observe how the storyboard panels showcase the app’s key features and user journey through a series of shots. The illustrations and captions bring the story to life.
Luca and Alberto Eat with Guilia and Massimo – Pixar
This charming Pixar short shows Guilia having friends over for dinner. The side-by-side video displays the storyboard above the final animation. Observe the detailed level of sketches, camera angles, captions, and pacing in the storyboard.
“Married Life” from UP – Pixar
In this iconic and emotional scene from UP, the original storyboard is overlaid on the finished animation. Notice how the storyboard effectively maps out complex character action and motion across multiple shots.
Sony Storyboard Artist Patrick Harpin
This video profiles Sony Pictures storyboard artist Patrick Harpin as he shares tips on how he got started in his career and walks through the storyboarding process. He explains how he got his break at Blue Sky Studios on Ice Age.
Studying professional storyboard examples like these side-by-side with the final animation is an invaluable way to learn strong storyboarding techniques.
Key Takeaways
- Storyboards visually map out each scene and shot sequence in your animated film before production begins.
- Creating a well-planned storyboard saves significant time, cost, and frustration during the animation process.
- Effective storyboards use sketches, captions, camera angles, transitions, timing, and other filmmaking techniques to set up each shot.
- Collaborating across teams on the storyboard improves alignment and identifies issues early on.
- Refer back frequently to the storyboard during production to maintain creative vision.
Animation Storyboards: FAQs
How many panels should be on each storyboard page?
This can vary based on your preferences, but 3-6 panels per page is typical. Focus on breaking down your story into logical scenes and shots.
What software is best for digital storyboarding?
Some popular options are Toon Boom Storyboard Pro, PowerPoint, and Adobe Photoshop. Choose a tool you and your team are comfortable with.
Should we create detailed sketches for the storyboard?
In most cases, simple stick figure sketches are sufficient to depict the action and framing of each shot. Elaborate sketches can take too much time upfront.
Who should provide feedback on the storyboard drafts?
Seek input from animators, producers, creative leadership, and anyone on the core team. Collaboration is key. You can even share externally for fresh perspectives.
When should the storyboard be finalized?
Ideally, lock in your storyboard before starting any animation work. But leave room for reasonable revisions based on discoveries during production.